
I ended up cutting the stainless channel that holds the rubber seal so that I could reshape it to better seal bot at the top and at the "A" pillar. After that was done I re welded the front edge back to it and installed it. The roof edge that I had already welded on when I removed the rain gutter was all wrong at this point and had to be cut back away and a new one fabricated that would properly capture the stainless track.
I primed and painted the inside of the door shell and then prepped the outer skin to finally be attached to the inner. Since I am not running the outside belt moldings I had to re-make the upper rim of the skin to eliminate all of the holes on the top side.
I also had to install some fiberglass honeycomb board just below the door handle location to stiffen it up . This was applied with 3M double sided trim tape. If you ever use that stuff if you'll clean both surfaces with acetone you will have a hell of a time getting it back off.


One of the other things I had to do was to make a backer piece for the rear view mirror to strengthen this area. I worked a piece of .060 steel to the shape of the area then stuck it into place with the 3M tape. When the mirror is bolted on this will hopefully reduce any flex in the skin there.
One thing I did once I got the inner door placed where I wanted it was to drill a couple of 1/8" holes in the hinges so that they would be easier to re-align when re-installing them.
Finally I attached the skin to the inner door. Pretty satisfying having a solid door back on the car.


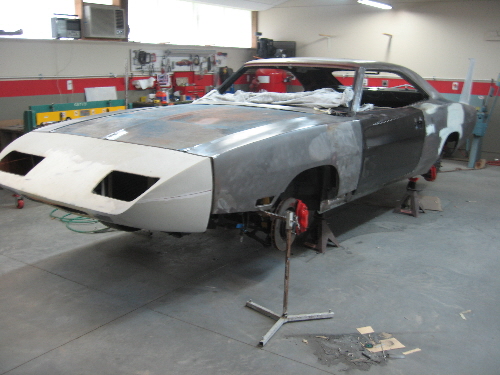
The window project really made me feel like I was stuck on a one way dead end street. Seemed like whenever I thought "all it needs now is a little tune up" I would find something that would make me go back to square one. To keep up the momentum I decided to fool around with the nose. At the outset I had thought I would build a steel nose and just use the glass one as a guide. I decided that Dane had a pretty good argument about the durability of the glass nose so I decided to just go with it. I needed to come up with a way to hang it on the car so I first installed an "L" bracket at the inside top of the nose. Then I put a "Z" flange on the lower back rim. The idea being that it will hang from the top and then be captured at the bottom.
The next thing I had to do is create a solid mount off of the bumper support on the SRT. I used some .060 steel angle to pick up both front rails of the car and then found bolt up positions on top of the support.
I built a 3/4" x 3/4" frame that fit the inside back of the nose. I then mocked the nose up so that I could attach the frame to my new supports. The nose hung on quite nicely when all was said and done.


As you can see by this picture I decided to glass in the Daytona grill and cut a Superbird style grill in to the bottom of the nose.
This is something I had thought about since I first saw the two cars. Seems that the Charger got cheated out of the better styling because it was a rush to get it to the track. So I am taking this opportunity to add those few touches that I think made the Bird a better looking front facia. I got some Coronet turn signal lenses from E-bay. A whole lot cheaper than the Bird re-pops at over $200 for two lenses. They should work fine.
I also went the route that Dane and Daytonalo took and pushed the nose back to the fenders to eliminate the 1" gap. This does cause some issues with the fenders being wider than the nose but I think I can sort that out.


No comments:
Post a Comment