Sunday, June 26, 2016

Early on when coming up with ideas as to what I wanted to do on this build one of the features I had to give up on due to time and cost was a real carbon fiber wing. I had reconciled to just paint the wing. I final blocked it and sealed it but decided to try to wrap it with some 3M 1030 series vinyl wrap. If it did not go well I could always peel it off and paint it but I am pretty happy with the results. I was going to clear over it but to my disappointment I cleared a sample and it pretty much doesn't look like carbon fiber after you do that so here are some pictures of the results.


Well I finally got some paint on the rear bumper.  I also made an EDPM gasket for the the drivers door mirror and mounted it.

Sunday, June 19, 2016

Finally I got the heavy blocking done on the wing and the back bumper. They got a final coat of K2 primer and will get light blocking and hopefully some paint.


So I had posted a YouTube link for the video of the headlight door test. Here is the link again and also some screen grabs from the video.    https://www.youtube.com/watch?v=eYNtKJ_-rS0


Well the last thing I had to do before I could put the nose back on the car was to make up a cover for the headlight door motor and wiring. Since it is in the air stream I needed to protect it from debris. I bent up some .040 pre-painted matte black aluminum and fixed it into place .

Once that was done I installed the nose on the car. It was touch and go since the nose was now loaded with equipment and I had not had it on since I put the 1/4" rubber gasket on but I was pleased to see that it was just the right size to give the seam a finished look.


Sunday, June 12, 2016

It has been 3 1/2 years since I dismantled this car and I found some ducting that was rather mysterious until I figured out that it went under the rug in the front to send air to the back seat area.

I re-assembled the center console as it came out of the car...............Yeah. That rear seat DVD player had to go. I have an arm rest from ebay on the way.


Here is a picture with the rubber molding applied to the front fender.

The second picture here is a view looking up at the side window seal where it meets the head liner. I decided to use the 06 finish molding/door gasket for this area. It finishes the joint nicely but also I found it to be more compliant when rolling the window up to it.

I got the seat belts back in and spent a little time learning how to apply window tint to the quarter glass. Unfortunately I learned a little about old glass. What looked like pretty decent quarter windows looked awful once the tint provided a dark background to highlight all of the age scratched on the outside surface. Kinda looked like someone dressed up in a tux with muddy shoes when it was in. New glass already on the way.

Also started getting the rug back in the car.


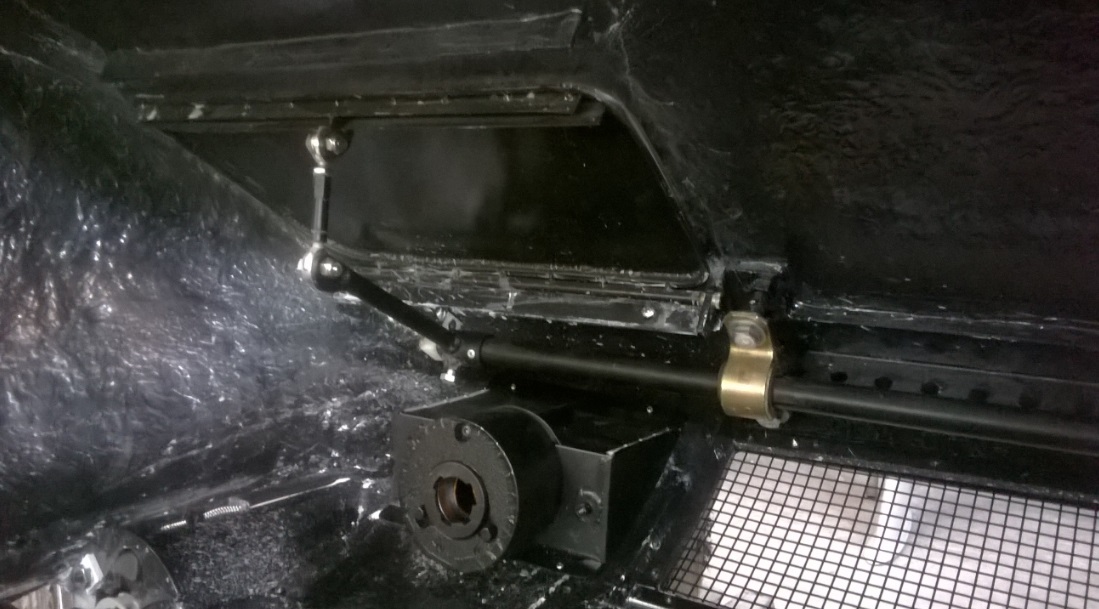
I wanted to include a close up shot of the attachment prop to the doors. I used two heim ends one right hand thread and the other reverse so that I could have a final adjustment to tighten up the doors. I used these also on the center actuating arm so as to relieve any binding through the range of motion.

I put the bug eyes back on the car for the last time in prep for putting the nose back on the car.

I sanded an polished the clear coat on the chin spoiler and installed it on the nose.
I also finished the fabrication to put the 06 side markers in the side of the spoiler.
Here is where I ran out of steam because it looks ready to put on but I realized I still have to make a box to cover all of the wiring and motor for the headlight doors as they are in the air stream and will get hit by road debris. It is always something.

In order to dampen any vibration between the nose and the fenders I added this 1/4" self sticking rubber gasket that compresses down to 1/8" to the face of the front fenders.


Well I always think I will get more done than I can. This weekend was no exception. I wanted to finish out the nose and re hang it on the car for the final time. I did manage to get all of the mechanisms back in. It has been so long since I built them that I had to reference my photo history to figure out how to put it back together. There were a lot of funny moments with me saying " Well. How about that? I did not know I did that."


Monday, June 6, 2016

Well I only got one day in on the car this weekend so I was just able to get the head liner and all of the accessories re installed.
Also got the "A" pillar covers back on. I tested out all of the courtesy lighting on the grab bars and the (essential for all hot rods) make up mirrors on the sun visors and all are in working order. I also made my final connection of radio antenna and mounted it on the rear package tray which I also did my final installation of.


Thursday, June 2, 2016

I also started the process of refurbishing the tail lights. First step was to repaint the little silver line.
Then I masked out and re painted the black.
Finally I gave them a clear coat.


Here are some other small details I took care of this weekend.
The barrel lock to the trunk lid was one of the first things I did over 3 years ago and it is finally installed.
I am now able to open the doors without reaching through the door handle holes.
I was going to paint them out the same as the body color but after a test fit I liked the way they looked. They carry the black from the wheels over into the body.


I had purchased a insulation mat for under the hood but I like the shiny look of the underside of the hood. So as to not waste $50.00 I cut it up and glued it to the underside of the roof as sound deadner.

I also installed the side window gasket molding. I had drilled some cleco locations before I uninstalled it so that hopefully I won't have to adjust it's location again.


I installed the signal lights , the grill and the running lights into the nose. I also got the rest of the dashboard assembled. I tested out all of the heater controls and the radio and that all works. I did have to take the radio back out because they don't work so good with out the antenna hooked up. I got one of those cheap powered hot rod antennas that you can stick to the windshield but since the wiring went to the back window I just stuck it there on the package tray and it seems to work fine.

Of all the things I have done to this car sticking those stinking HEMI badges to the door was the first thing that got me really excited. What the hell?

I sanded and clear coated the chin spoiler but I got some junk in it so I have to sand and buff it.