Sunday, June 30, 2013
Well I finally got my compressor rebuilt. New head , motor, plumbing and belts. While it was down I got antzy and decided to do some more tear down on the SRT-8. I got it pretty well gutted.Man there is a mess of wires in these new cars. Pretty simple to tear down though compared with older cars. Minimal fasteners on just about everything.
Sunday, June 23, 2013
Every gen 2 Charger came with a leaf and debris catcher as standard equipment. As you can see mine is no exception. At least there are no critters living in here. Cutting the cowl off was the last thing I did a couple of weeks ago when my compressor crapped out and I made the bad decision to rebuild it. I am still on that adventure waiting for the proper belts to drive the replacement head. They have been on back order for 2 weeks.
Since the compressor was down I decided to start taking the easy stuff off of the 06 Charger. When I removed the rear bumper cover I found these neat little vent pieces in the side wall of the trunk. They are hard plastic with rubber flexible louvers. Can anyone guess what I am thinking these will be perfect for? Since I had the tires off the car I decided to play around and see what they would look like on the 68. Something tells me I am going to need a large sub woofer with these.
Thursday, June 20, 2013
I stripped out the interior re enforcement on the sail panel to remove any rust underneath and to clean the re enforcement pieces up also. I re installed an abbreviated version of the re enforcement towards the front of the sail panel and then fabricated new re enforcement the rest of the way back to the window bed. this will provide an under structure for a smooth transition in the head liner back to the glass.
Well this pretty much catches me up on this project as far as posting the progress on this project since last September. From here on out I will be posting hopefully every couple of weeks as I move forward. Progress has ground to a halt since my compressor crapped out and I have been in the process of rebuilding/upgrading it. I only lack some "v" belts which are on back order. Thanks to everyone who has commented.
Well this pretty much catches me up on this project as far as posting the progress on this project since last September. From here on out I will be posting hopefully every couple of weeks as I move forward. Progress has ground to a halt since my compressor crapped out and I have been in the process of rebuilding/upgrading it. I only lack some "v" belts which are on back order. Thanks to everyone who has commented.
Tuesday, June 18, 2013
Getting rid of rusted material. The lower front of the quarter panel was not rusted but it had been lumped up pretty good and rather than spend a lot of time trying to dolly it out and then have to put a bunch of mud in it I decided to cut it out and replace it. I have to do the other side also. It was good though because I was able to get in to see the rear frame rail and clean it up, treat it and primer it before replacing the panel. Everything underneath was in pretty good shape.
Sunday, June 16, 2013
Saturday, June 15, 2013
With the lock mech in place it was time to re skin the deck lid and set it in place. I used this SEM product to go between the skin and the inner liner. It said there was a 2 minute working time but it was more like 10 seconds because when I was done with the application I had to pull off the mixer nozzle before the material expanded back into the tube.
Friday, June 14, 2013
After mending in the roof I moved on to replacing the panel beneath the window. I laid out and fitted a piece of .035. I had thought looking at pictures that it needed some compound shape for strength. After English wheeling it and laying it back in place I decided it needed to be flat and tossed out the first piece. Satisfied with the second piece I welded it up.
I wanted to make sure I had all the fabrication done to the deck lid before I re skinned it so I decided to see if there was a way to use the lock mechanism from the SRT.
With a couple of swipes of a rat tail file I was able to clearance the old hole for the new barrel. I had to invert the lock mechanism as the lock is in the lid of the SRT and the latch on the car. I was able to invert it by replacing a rubber pull mech with a steel push rod to actuate the lock.
Wednesday, June 12, 2013
Tuesday, June 11, 2013
Before installing the window bed I removed the drip rail in order to get between the two layers to clean and treat the metal and then I fabricated a new rail .
After the final fit I tacked the window bed into place between the sail panels.
Next I shaped a transition piece to go from the window bed to the roof. I ran this piece up the roof until it made a smooth transition as the side to side arc of the Vega plug does not exactly match the Charger roof. It is higher in the center of the plug. The window bed is positioned approximately 12" up from the center of the front of the deck lid.
After tracing the outline of my transition piece on the the roof I cut the rear roof support out and then the rear roof section so that it would be a flush fit. I temporarily tacked the old rear roof to the under side of the roof to maintain the arc since the rear roof support was now gone.
Monday, June 10, 2013
Time to move to the rear window. I started by clearing away the support structure under the hatchback. Next I clearanced the sail panels about 1/4 inch on either side . Next I test fitted the plug into place holding the bottom up with some 2x4 blocks until the window portion laid on the sail panels the way I wanted. I tried relief cutting the lower section and working it down to the sail panels but I wasn't happy with the way it was torquing the lower window bed and decided that I would be more comfortable just cutting the lower section off in favor of putting in a new piece of metal. The last picture shows what is left of the window bed. While this might seem like a waste to only use the bed portion of the plug if you have ever tried to fabricate a window bed with tight radius's around a compound shaped piece of glass you will know this remaining piece is a time saver.
Saturday, June 8, 2013
The first picture in this group shows the final fit with the tail light lense in the surround before installation in the tail panel.
The second picture is of the surround installed followed by a picture of a test fit of the tail lense.
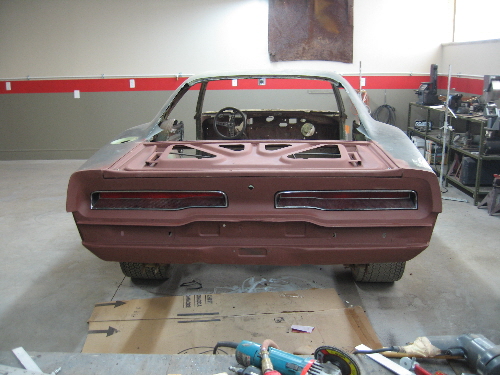
The final picture is of the completed tail panel with the tail lights fit in place. I use the rustoleum red oxide as a temporary primer to prevent flash rust until I get to the bondo work.


The second picture is of the surround installed followed by a picture of a test fit of the tail lense.
The final picture is of the completed tail panel with the tail lights fit in place. I use the rustoleum red oxide as a temporary primer to prevent flash rust until I get to the bondo work.
The first of these 4 pictures shows the tail with most of the upper section done as far as metal repair. The two tail light openings are roughed in and the upper right corner of the quarter to tail pan needs to be made.
The second picture is of the right side lower quarter panel replacement steel after installation.
Picture 3 is of the right side upper corner completed.
The last picture here is of the tail light housings that I back engineered from the tail lights I was able to get from the guy Troutman for $75.00 apiece.
Friday, June 7, 2013
On the right side of the car I wasn't as lucky to have a roll pan corner to reference so I made two profile patterns of the left side and used them to guide me on the shape and location.
I then installed a new right side roll pan piece up to my templates.
The third picture is of the completed roll pan.
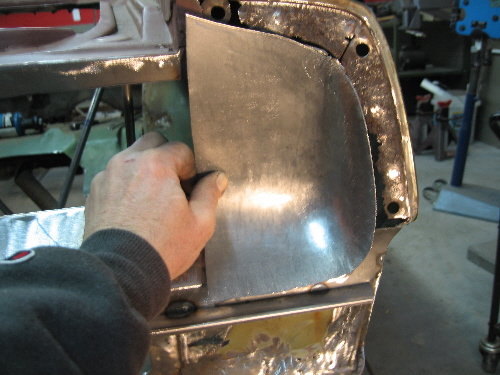
Next it was on to more rusty metal replacement on the upper tail light panel. This right side dished piece was a little tough to make without a planishing hammer. It is kind of small for the English wheel but that is what I had to use after metal shrinking the edges and using a mallet and a sand bag to work the depression.
Subscribe to:
Posts (Atom)
