For anyone who might be curious here is a link to a Youtube video of the car on the road for the first time.
https://www.youtube.com/watch?v=uIkCBnmFDDk

Sunday, October 2, 2016
Tuesday, August 23, 2016


Saturday, August 20, 2016
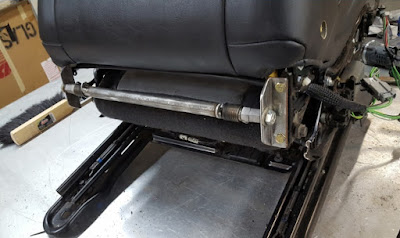
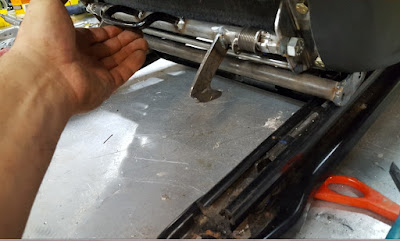
Finally the seat was installed in the car. This picture shows it all the way forward on the rails but I ran it back and I can still get into the back seat area .
So I never gave it much thought but the car did not have a spare and jack set up. I thought it went missing before I got the car. Nope. Turns out the SRT-8 came with a small air compressor and a can of fix a flat. There is not enough room in the spare tire area for a 20" spare. 17" is max. Problem is the 17" will not fit over the front brakes. There are several solutions to this problem that I read about but the one I chose is to get the 17" spare and if a front tire goes flat put one of the rears on the front and use the donut for the rear. It is really funny to me that I am trying very hard to be diligent in trying to keep this car to factory standards ,as much as that is possible, only to find out that the factory cut corners.
Another surprise to me during the exploration of what to do about the front seat tilt was in looking at a Challenger the only way you could sit in the back seat is if you were a double amputee. There is about 4" between the back of the front seat and the front of the lower cushion.
Also one of the few things to go smoothly was me finding short enough wiper blades to attach to the modified arms I had made. So shocked.
I put in a new battery. $200 for that sucker but that is what doctor Dodge prescribed.


Using the plastic stud as a guide I made a new steel tab for the attachment point which was welded to the seat base . I then removed the plastic stud.
A bit of plastic had to be trimmed from the top side of the plastic cover in order to allow the side of the seat back to rotate forward without pinching the upholstery.
The seat belt catch is attached to the other side of the seat and so that the wires for that would not catch in the pivot I had to create more slack by moving the plug for those wires closer to the back of the seat.
I then put the painted seat catch assembly back on the seat back.


With the hooks in a locked position I welded in a piece of 3/8" tubing to act as a stop on the rotation of the hooks so that when the seat back is lowered the shape of the bottom of the hook rolls the hooks open to then grab around the lower bar.
I then removed the entire device to paint it.
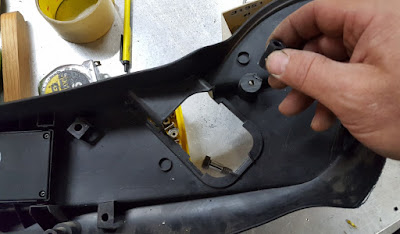
There is a side cover for all the switches to the seat which had to be modified in order for the seat back to rotate past it. I trimmed about an inch off of the rear side.
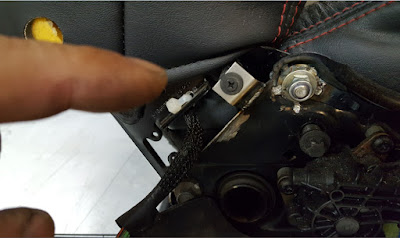
There were three attachment points for the plastic side cover and the rear was attached to the seat back so the plastic stud that located the screw had to be cut off.
Using a little double stick tape I placed the cut off stud temporarily to its old screw location.


I then removed the entire device to paint it.
There is a side cover for all the switches to the seat which had to be modified in order for the seat back to rotate past it. I trimmed about an inch off of the rear side.
There were three attachment points for the plastic side cover and the rear was attached to the seat back so the plastic stud that located the screw had to be cut off.
Using a little double stick tape I placed the cut off stud temporarily to its old screw location.


The bolts ended up being a little two long in the tube and were causing a little drag so I shortened them up to about 2" and then place the assembly between the "L" brackets.
Once I was satisfied with the location of the tube I welded the ends to the "L" brackets to keep them from rotating leaving the center section to rotate and return with the springs.
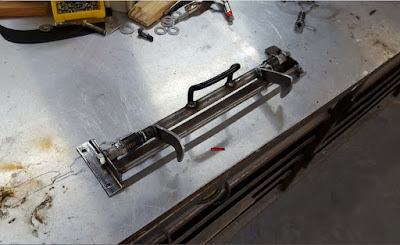
I then welded another 3/4" tube with brackets to the lower section of the seat. After that was done I cut two hooks out of 3/16" flat steel. I rotated the center shaft to put it under tension and welded the hooks to the shaft.
I then added a "U" shaped handle so the whole thing could be rotated.


Once I was satisfied with the location of the tube I welded the ends to the "L" brackets to keep them from rotating leaving the center section to rotate and return with the springs.
I then welded another 3/4" tube with brackets to the lower section of the seat. After that was done I cut two hooks out of 3/16" flat steel. I rotated the center shaft to put it under tension and welded the hooks to the shaft.
I then added a "U" shaped handle so the whole thing could be rotated.


I then made up two brackets out of 1"x 1" steel angle and attached them to the lower seat back.
I had some spiral return springs that would slip nicely over some .125 wall 3/4" steel tube.
I then made two end pieces that could be bolted to the "L" brackets out of 2 bolts that sleeve nicely into the tube.
On the bolts and on the tube I welded tabs to capture the spring ends which I had been bent to 90 degrees.


Well this weekend was a challenge that I was going to give up on except for the fact that even when the passenger seat was run all the way forward there was no way to get into the back seat. I had determined that I was going to make the seat tilt forward but when I looked at it I wasn't sure it could be done. After seeing that access was impossible without a tilt forward I took it back out and gave it a second look.
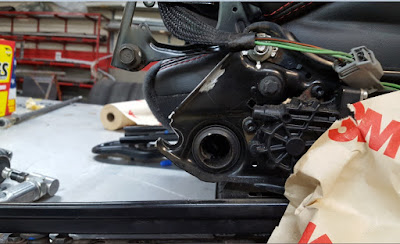
The seat back is held on by two bolts on each side. By removing the lower one the upper one becomes a pivot point. Since it was designed to be tightened I replaced the top bolts with sleeve bolts and nyloc nuts so as to leave the pivot loose while still tightening the bolts.
I then clearanced the lower bolt hole so that the lower bolt threaded partially in would act as a stop when the seat back was in the upright position.
I put a lock nut on the back side of the partially threaded lower bolt to keep it from backing out.
There are wires running up into the seat back so I drilled a couple of holes and tie wrapped them in such a way as to not get them caught in the pivot.


Tuesday, August 9, 2016
So after much nail biting I got the rear window trim on the back glass. What a pain that was. I was sure more broken glass or dented trim molding was in my future.
The good news is that the company that made my door glass was sold to a company that still has the mold and is willing to make me a replacement for $500. Hopefully that will go well. I will have to ship the existing glass to them for an exact trim fit but for now I am going to leave it in the car and finish out the jambs and sill work.
The back seat area is done and thank goodness the seat folds down because I have to go into the trunk and replace my fuel filler line. I chose silicone hose on the recommendation of the NAPA salesman for the filler tube Because it has to travel so far across the wheel tub some gas was laying in the tube and the fumes in the trunk were frightening. Turns out the silicone tube is a bit permeable. I got the gas that was laying in the tube to drain out and the smell went away immediately but some custom stainless steel line is in order.
I also got the front windshield moldings in place. Another nail biter as this was my second windshield.


Subscribe to:
Posts (Atom)