Sunday, November 23, 2014

One of the negative aspects of installing fixed headlights in the nose is the fact that they loose the ability to cast light to the side of the road due to being buried in the nose. I decided to see if I could install the driving lights from the 06 at the split where the chin spoiler and the lower nose meet. I found that a piece of 4" PVC was a near perfect fit to fashion a housing for the light module.
using  some scrap I worked out the cut pattern for the under side of the nose. I then fit up the housing in the whole. The nose was set level up so that I could also level the housings.


I slotted the top of the PVC so that the leveling adjustment screw on the fixture could be used. Once I could slide the unit into place I made the back of the housing out of some lexan cutting out the back to clearance for the bulb and enable the plastic clips to hold the unit in place. 
After gluing the back on the housing I fused the housing to the nose.

I mocked up a chin spoiler out of sheetmetal to look at the proportions. The lens on my camera is kind of a fish eye or wide angle so although the chin spoiler is big it looks a lot bigger in this picture than is really looks in person. Be that as it may I have to tweek on the spoiler a bit yet to get it where I want it.


Monday, November 17, 2014

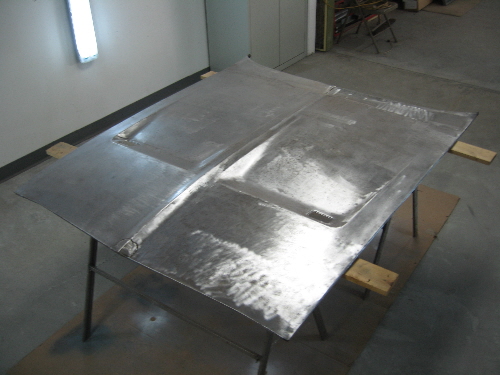
Because of issues with the wipers and the AC ect. I decided to create a modern looking cowl arrangement which includes a sunken blackout area just behind the hood for the wiper motor and the fresh air inlets. This will allow the wiper motor and arms to be serviced from the outside top as it is in the 06 Charger as opposed to the under dash set up on the original B body. I had always thought these cars might look a little better with a hood similar to the 71 B bodies. So this was my chance to fool with that idea. The only difference is the wipers won't be buried like the older cars but more exposed like a modern car (just a matter of practicality and space).


Sunday, November 16, 2014

I fabricated the headlight mounts this weekend. Here is how they look with and without the nose.


I got the hood all put together and stripped the paint off it so I got that going for me now.


Sunday, November 9, 2014

So I decided to take apart my headlight doors and mechanism to refine some stuff I didn't like. I had re hinged the doors to the front of the opening so that the sweep of the door would be minimized in order to push the headlights as far forward as possible but I did it with some stainless steel piano hinge. It worked but was a little crappy looking and didn't work as freely as I would like. So I went ahead and redesigned the hinge using a piece of 3/8 tubing with  threaded inserts in the ends and used some stainless steel shoulder bolts to secure the tube to a pivot plate.  I secured the doors on the same plate I had already fused to just under the front of the headlight door where the piano hinge was fixed to 10/24 threaded inserts along the plate.


When I first mocked up the mechanism for the headlight doors I was determined to use the window motor left over from the rear doors of the 06. It worked o.k. but was a little to quick. Swampwing2 convinced me to head in the direction of using a gen 2 Fiero headlight motor. Since I was only using one motor I was able to score a control module from the motor re-builder that was dead on one side for $25.00  The beauty of the control module is it removes the need for any limit switches because it senses the increased amperage draw when the doors hit a mechanical stop and it cuts power to the motor. It took a while to get the arms to the right lengths in order for the motor to run at a slower speed even though the motor is geared lower than the window motor. I put some adjustable arms to the doors in order to allow me to tighten up the doors to the nose.


Here is a link to a video of the doors in operation. 


This video shows how I rigged up the drop down doors for the head lights on the Daytona project.
Posted by Steve Mirabelli on Sunday, November 9, 2014


After messing with the headlight doors I decided to tackle the signal light housings.  I started by working out the pattern for how the housing would fit the nose and cutting out the openings.
Next I fabricated the housing out of .021 steel and cut an opening to fit the 06 signal housing. This way the existing 06 bulbs fit right into the back of the housing.


The way I had to cut the 06 housing out of the rest of the headlight assembly meant that it wasn't a complete surround for my purposes so  the first thing I did was to make a complete back to the housing out of 3/16 plastic. I then wrapped the outside with .040 aluminum. This will allow me to seal the entire housing.


With the housing painted out satin black I cut some adhesive backed reflective foil the shape of the signal lense and stuck it to the back of the housing.
The last two pictures show the lense in place and then set into the nose with clecos.