Sunday, June 22, 2014

I finally got the rest of the panels covered with vinyl and I am pretty happy with the outcome. Only thing is, I have about 100 hours in this one door panel so at the rate I am getting after it I probably won't be done with the other side until the fall.

Also got my window blanks in from Pro-Glass. They look pretty good.


Sunday, June 15, 2014

Still working on the driver side door. I figure I have about 80 hours in it already and I am not done. I ordered two polycarbonite side glasses from Pro-Glass. I just ordered two oversizeds 69 Camaro blanks. The arc of the window is pretty much a perfect match and I only needed about 2 " more in length. I will be waiting for those to finalize how my window tracking is set.
I unwrapped the drivers door harness to lay it out to reach everything the way I have it now. I also cut out the front of the door and the door jamb to accept the rubber harness boot.


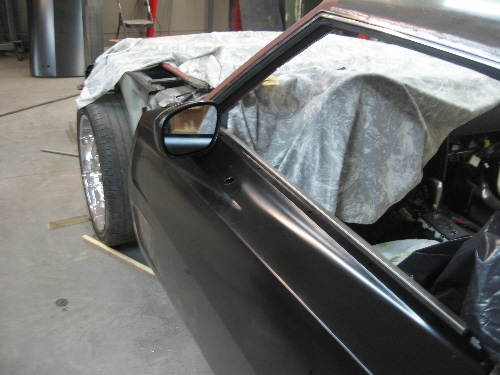
For months I thought I had the side view mirror issue well in hand. Since the 06 Charger mirrors were integrated with the window frame there did not seem to be a way that I could use them. I purchased two 2010 Challenger side view mirrors because the way they mounted to the door seemed more appropriate and the wiring would be the same for the remote operation. Well I mocked them up and they looked ridiculous. Way out of scale for the car. They looked more like auxiliary fuel tank pods for a jet fighter than side view mirrors.  I had no plan  "B". I took the one 06 Charger side mirror (the other was wrecked off the car) and started whittling it down with an air saw until i just had the basic mirror with the harness and actuators left. I mocked it up as close to the car as possible and as low on the door as practical and then built a mount that would transition from the mirror to the door.


A number of trips in and out of the car and I got the angle where I wanted and finished up the cradle. There are 2 10-32 bolts welded into the base to attach it to the door and I made stand off pads from some 1/8 inch EDPM glass setting blocks.


 The door skin is just mocked up in place by the way so that I can settle some of these issues. It is not ready to go on yet.  Here are some pictures of the the way the mirror sits in its cradle and how it looks on the door. It is a lot farther forward that the 68 mirror would be but a lot lower because of it's size.


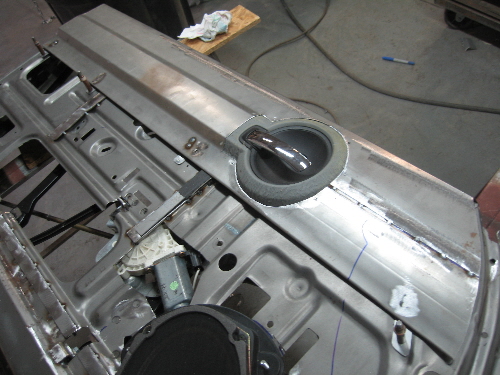
While the door skin was in place I went ahead and fit the outer door handle in as per the mock up pattern that I had made earlier.I bought 1970 Dodge Challenger window wiskers because of the vent window delete. They were only an inch too long which is perfect.
They curve up on either end so I carefully relief cut the stainless on the back side being careful not to cut through the top bead or the front whisker. After a few cuts I was able to hand shape it back out straight. I then had to drill out new oval holes for the clips to fit into. After marking out the locations I drilled two 3/16th holes about 1/2 inch apart and used a die grinder to connect the dots. Lastly I welded the two tabs for the door handle to bolt to on the back side of the skin.


In between things I was working on the inner door panels. It has been about 30 years since I did any auto upholstery and back then a door panel was a flat piece of masonite with some vinyl stretched over it and maybe a few pull buttons for style.  I am trying to reproduce the SRT style inner door panel with the 68 door proportions so this is more than unfamiliar territory.  I built the door panel out of .021 steel and I filled in the tight transitions with dense styrofoam. After that I smeared some bondo on to smooth the transitions. The first attempt at covering the lower panel was a bust so I had to strip it of all the glue and start over. The transitions were just a little to deep for  the vinyl so I am in the process of remodeling them.


I did manage to get the arm rest covered with only a few mishaps.   Kind of looks like a ship model 


Sunday, June 8, 2014

It has been slow at work for the first time since November so I took a couple of days off and tried to make a little head way. I decided to focus and get as much sorted out on the drivers door as I could. I started with the outside door handle. I made a mock up of the upper  right corner of the door skin so that I could work out the location and re bend all of the actuator rods to work the lock and the handle. I used the 06 handles and it worked out pretty good.


You wouldn't think setting a door speaker would be a big deal but the 06 door speaker has a plastic housing that protects it from rain water that had to be accommodated. I had to relief cut the lower door to get it to sit flat with the inner door panel.


The top of the door on the SRT had a detail that I decided to try to reproduce. I used a small segment from the original door panel with the inner door handle as a guide and made the top panel out of .021 steel.
Using the original arm rest as a model I built one that looks something like it again out of .021 steel. I was able to scavenge the door pull section and work it into the new arm rest. I also cut out and set the power window buttons in this piece. This piece is separate from the upper so that it can be covered with vinyl as the top pieced will be.
Below the arm rest I began to shape the lower door panel out of bits and pieces of steel again trying to reproduce the style of the front 4 door inner panel.


I worked up the lower panel that will include a map pocket on the door since I was able to scavenge the speaker cover from the 06 which has the front side of the map pocket attached to it.


It is far from done but it is shaping up the way I had hoped. I had it on and off the car a couple of times making sure I wasn't getting jammed against the dash. Covering this is definitely going to be a challenge. I will have to Bondo all the seams and make some more foam transition pieces. It might seem like I am getting ahead of myself with this inner panel but locating all the innards and making sure all of the stuff works before I skin the door is prudent I think.


Sunday, June 1, 2014

Well I am a little disappointed. When I was in the planning stages of this project I consulted with a guy who does hot rods for a living and he gave me the name of an outfit that when the time came could provide me with tempered curved side glass to my patterns. Well because of new government testing requirements they are no longer able to provide this service for small customers. Seems that if  you now make any glass it must be DOT approved with a shatter test and the glass must break into specific size pieces. Needless to say it is now cost prohibitive to deal with small custom orders. He gave me the name of an outfit in Michigan that still does this but 2 pieces of side glass were going to cost upwards of $5,000.00. Maybe if this was an open checkbook deal I would bite the bullet and go for it but since I am on a budget that is out. The other option was the guys that did the "Fast and Furious" cars and the "Drive Angry" cars. They quoted me $1,300.00 for two pieces of laminated safety glass. The more I thought about it the more that had disaster written all over it. The window is long and there are considerable torquing and laminated glass is more than fine if it is immobilized but this glass is operable. So that leaves me with one option and that will have to be molded polycarbonate. While it is susceptible to scratching it can be easily trimmed and finished should it be made wrong and can more easily be replaced.


Anyway the first thing I needed to do was to make a accurate pattern of the glass with the arc in the panel. This is mainly because I needed to checkout how the arc would engage the "A" post area. The Lexan mock up window is flat stock so the arc disappears soon after the Lexan leaves the "B" post molding. What I did was to roll two pieces of .021 steel to the arc of rear window trim. I then I sandwiched 1/4" x 2" plywood strips between the two panels with contact cement.
Since Lexan is pretty flexible  I made a .060 steel channel to drop the glass into that will engage the carriers on the window regulator. The channel will keep the bottom of the glass straight.
The next step was to cut a piece of Lexan and  refine the shape a little.x3/4
The window regulator out of the 06 is two independent tracks with cross over cables to connect them. I bent some .035 steel 3/4"X 3/4" to connect these together as one unit. The stays were temporary. Once tied together I was able to align the tracks parallel with the stock rear window guide. I used a piece of square sheet metal to space them out. At the same time I centered the grab clamps with bottom of my widow channel and welded two 3/16ths steel tabs for them to grab on to. I temporarily tacked whole mess to the inner door shell.
I then hooked up to a battery and tested the regulator and made a bunch of adjustments.


Once I was somewhat satisfied I was in the ball park I made some permanent mounting points out of 1/8" steel strap. I made them in two pieces so that I could slide them in and out if I needed to make further adjustments.
Once all the permanent pieces were made I removed the 3/4 x 3/4 temporary braces. I still have a ways to go with this there is all kinds of stuff here to consider.


Here is a little video of it in operation.


Window regulator
This is a short clip showing the 06 window regulator adapted for use in the 68 door shell.
Posted by Steve Mirabelli on Sunday, June 1, 2014