Sunday, November 24, 2013

In order to finish up the cowl I had to see how the hinges would play into the whole deal so that meant I had to get involved with  framing out and hinging the hood to the car. I was going to lengthen the hood to help the fender location but decided I wanted the proportions to be stock in length so that meant cutting the rear extension back loose and shortening up everything.
Since I was going to be removing all of the inner liner I had to build a hood jig or cradle so the the shape would not distort after I removed the support.
First thing I did was form some "L" shaped steel to fit the profile across the back of the hood and then transferred it to some 3/4" plywood and cut out the shape on the band saw.
I repeated the process for the front of the hood.


Next with the front and rear profiles sitting on the hood I traced the side profile and cut two pieces with this pattern to make the sides of the jig. 
Finally I put some triangle gussets on the corners to keep the whole thing square.
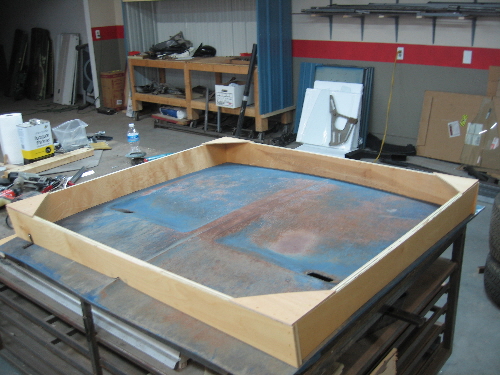
In the inverted position on the table you can see how the hood shape is completely supported. 


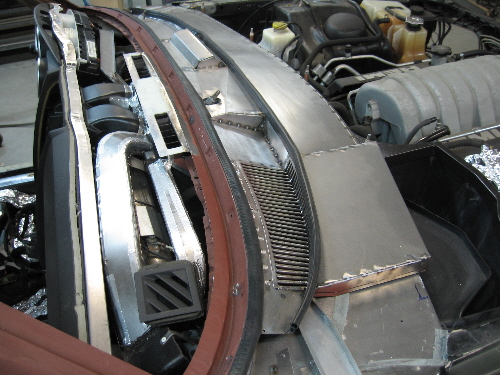
With the jig supporting the hood I removed the remaining liner and cleaned up the rust and treated with OSPHO. I then took some 1/2" x 1 1/2" .049 wall steel and framed out the perimeter and installed two cross braces of 1/2" x 2" .049 wall.
With the sub frame built I removed it from the jig leaving the hood skin behind to fit it up to the car. I used some angle iron to temporarily cleco the hood in place over the cowl centering it up on the car.


I had hoped to use some modified version of the 06 hinges but it just wasn't practical. I ended up making my own using some .090 steel with a 1/4" press fit hardened drill bushing to be attached with a 1/4 20 stainless sleeve bolt.
After determining the location with the hood frame on the car I put the frame back in the hood jig and slotted the bottom side of the hood frame at the back corner and slid the hinge in and welded it up.
The last picture is of the hood frame on the car with the frame in the raised position. Now that I have all of that established I can go back to finishing up the cowl.


Sunday, November 17, 2013

With the hood back out of the way it was time to start figuring out how I was going to build the recessed cowl to cover everything.
Once I had established the curve of the cowl I had to figure out a fresh air inlet. I kicked around a lot of different ideas for the grill itself and decided since I was not going to re install the old cowl that I would use adapt the grill work from it into my new piece.
I used scrap pieces of the rubber molding I was going to use to seal the cowl to the windshield bed to maintain my surface relationships while I fit up the various parts. 
Once I was done with the grill insert I had to build a short duct to move the air from the inlet to the fresh air inlet box in the engine bay. The last picture is of the floor of that duct mocked into place.


After building the top and the sides of the fresh air duct I removed it to prime, paint and seal the interior of the box before installing it permanently to the cowl.
In order to minimize the water infiltration into the area around the wiper studs I had to build two wells around the studs with a tight fitting rubber grommet. I back engineered the well from the grommet that would fit. It required a 1" hole and the well needed to be 1 1/2" to clear the wiper base. I punched out some .040 steel to create the bottom of the well and used some thin walled 1 1/2 inch steel tube for the well wall.  I welded the washer to the bottom of the tube first then fit the grommet in . After re installing the cowl I slowly clearanced around the stud until the whole well assembly slid down over the stud.


Once I had  the stud well fit up I tacked it from the top side then I removed the cowl so that I could weld it up from the bottom side and then trim off the top flush.
The third picture is of the cowl re installed with the well in place.
With the upper cowl established I started to close out the forward section starting with a "Z" flange with a top step to give me a front edge to go to. This worked out good because I already had flange to cover the firewall batting that I could drill into and avoid compromising the sub cowl.


I fit up some pieces to finish the surround to support the top closure.The last two pictures show the top closure on the forward section of the cowl.
There is quite a bit more to do here but just to see if everything was holding station and to try to get some feeling of accomplishment after messing with this for so long, I put the windshield base seal on and fit the rear hood seal to see how I all looks.


Saturday, November 9, 2013

I have been working on more of the pesky detail stuff over the last couple of weeks. I closed up the forward section of the sub cowl . I sealed all of the seams with T-21 Fusor epoxy. When I cut down the fire wall it left the fiberglass sound blanket with a ragged looking top edge so I had to fabricate a top cap for the air intake section and also for the area just above the brake booster and engine. Kind of just finishes that area up and will keep water from soaking the back side of the fiberglass blanket.


I made a couple of water run off gutters out of aluminum that will hopefully carry off the majority of water that gets by the cowl cover near the wiper studs.
In order to see how the cowl cover needs to be built I had to jump ahead and locate the hood and build the new rear section of it. Since the cowl will be a subduction type similar to a newer car I needed to establish the arc of the hood back.